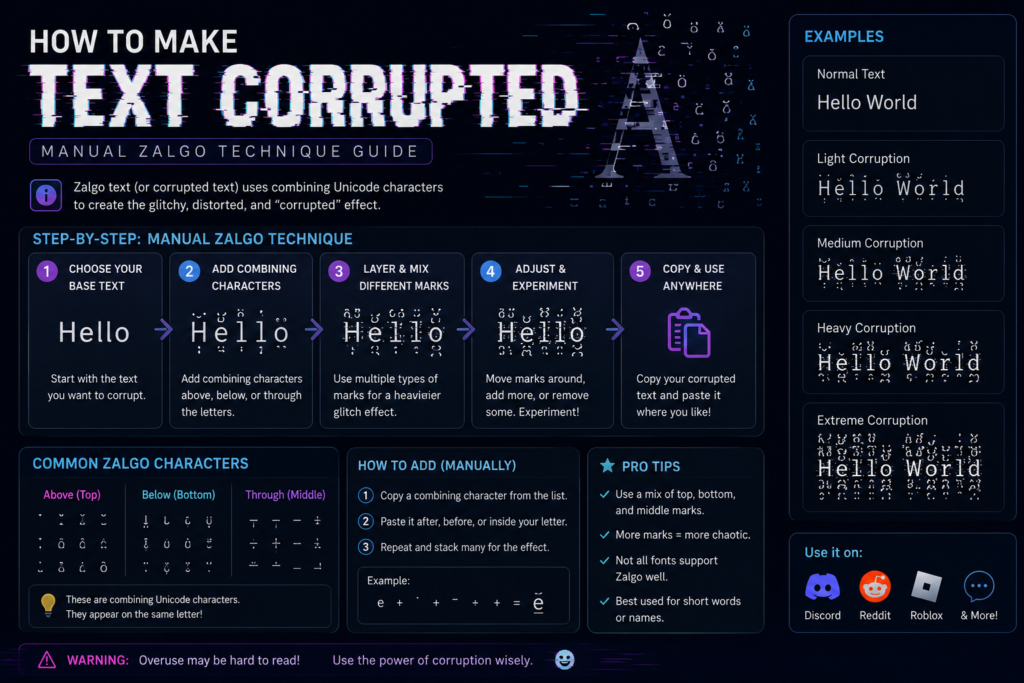
Corrupted text is built by stacking Unicode combining characters, code points in the U+0300 to U+036F range, directly onto the letters you already type. No app does anything a browser or text field can’t already do on its own; a generator is just automating a process you can technically do by hand, character by character, using nothing but Unicode input methods your device already supports. This guide walks through that manual process step by step, including where to find the actual code points, how to insert them without a generator, and where the technique breaks down in the real world.
Most explainers on this topic stop at “here’s what combining marks are.” This one is built the other way around: it assumes you already want to build corrupted text yourself, by hand, and walks through exactly how that’s done, plus the mistakes that trip people up the first time they try it.
What “Manual” Actually Means Here
There are two ways to produce Zalgo-style corrupted text. One is pasting a word into a generator and dragging an intensity slider. The other is manually inserting Unicode combining diacritical marks after each letter using your operating system’s Unicode input tools, no third-party tool involved at all.
The manual method matters for a few real reasons: understanding exactly which characters you’re placing (useful if a platform is filtering some but not others), building custom distortion patterns a generator’s preset sliders can’t replicate, or simply understanding what’s actually happening to your text before you paste something a generator produced elsewhere. If you’d rather skip straight to instant output, our Zalgo text generator applies the same underlying technique automatically, but knowing the manual version first makes you better at using any generator, since you’ll actually understand what the intensity slider is doing to your text.
Step 1: Find the Combining Marks You Need
Combining diacritical marks live in a defined Unicode block. Here’s a working set organized by where they attach, with their actual code points, so you’re not guessing:
Above-letter marks (these stack upward, toward the line above):
- U+0300 (grave accent)
- U+0301 (acute accent)
- U+0308 (diaeresis)
- U+030A (ring above)
- U+0310 (candrabindu)
- U+0327 (cedilla, though technically below, commonly grouped with these)
Below-letter marks (these stack downward, producing the “drip”):
- U+0316 (grave accent below)
- U+0317 (acute accent below)
- U+0323 (dot below)
- U+0331 (macron below)
- U+0332 (low line)
- U+0339 (right half ring below)
Overlay marks (these strike through or surround the letter itself):
- U+0334 (tilde overlay)
- U+0335 (short stroke overlay)
- U+0336 (long stroke overlay)
- U+033F (double overline)
That’s a small, deliberately manageable starter set. The Unicode standard defines far more than this inside the U+0300–U+036F block, but you don’t need all of them, a dozen or so mixed across the three categories is enough to build convincing distortion by hand.
Step 2: Get the Characters Onto Your Keyboard
This is the part that actually stops most people, because normal keyboards have no key for U+0331. There are three practical ways around that.
Unicode input on Windows. Hold Alt, type the hex code point on the numeric keypad after typing “+” isn’t how Windows Unicode input actually works for combining marks reliably, the dependable method is enabling the Windows Unicode Hex Input keyboard layout in Language Settings, then holding Alt and typing the four-digit hex value (e.g., Alt + 0331) directly after your letter.
Unicode input on Mac. Turn on the Unicode Hex Input source under System Settings > Keyboard > Input Sources. Once active, hold Option and type the hex code (e.g., Option + 0331) right after the base letter you want to modify.
Character map / palette tools. Both Windows (Character Map) and macOS (Character Viewer, accessible via Control + Command + Space) let you search by Unicode name or hex value, then click to insert. Slower than hex input, but useful for confirming you’ve got the right mark before committing to a whole word.
Copy from a reference table. The lowest-friction option: keep a small text file with your dozen chosen combining marks already typed out, and copy-paste each one after the letter it’s modifying. This is what most people who “manually” build Zalgo text actually do in practice, manual placement, pre-copied characters.
Step 3: Build the Word, One Letter at a Time
Here’s the actual mechanic. Take the word “help.” Type the letter H, then immediately insert one or more combining marks, they attach to whatever character precedes them, with no space in between. Move to the next letter and repeat.
A light-intensity build might look like this in practice: after each letter, insert one above mark and one below mark. Four letters, eight total marks, evenly distributed. The word stays fully readable but visibly “off”, comparable to what our Zalgo Unicode explainer classifies as light distortion, just assembled by hand instead of by a slider.
A heavier build repeats the same process but layers three or four marks per letter instead of one or two, mixing in an overlay mark on at least one letter to push toward illegibility. The order you insert marks in doesn’t change the final rendering, Unicode positions each mark relative to the base character and the marks already stacked on it, not relative to typing sequence, but building consistently (always above, then below, then overlay) makes it far easier to keep track of what you’ve already added, especially past letter three or four.
A Worked Example: Start to Finish
Take the word “night.” Six letters. Here’s a manual build path:
- N, add U+0301 (above) and U+0323 (below)
- I, add U+0300 (above) and U+0331 (below)
- G, add U+0308 (above) and U+0316 (below)
- H, add U+0310 (above), U+0339 (below), and U+0334 (overlay)
- T, add U+030A (above) and U+0332 (below)
Notice letter four (H) got three marks instead of two, that’s intentional. Uneven distribution across a word actually reads as more natural corruption than perfectly symmetrical marks on every letter, because real Zalgo-style text online rarely looks mechanically uniform. A generator applying random intensity per character is mimicking exactly this kind of unevenness; building manually means you’re choosing where the “spike” happens.
Common Mistakes When Building Zalgo Text by Hand
Inserting marks before the letter instead of after. Combining characters modify whatever precedes them. A mark typed before your base letter either attaches to the previous word’s last character or simply floats unattached, depending on the input field.
Overloading the same category. Stacking ten below-marks and zero above-marks produces a lopsided “drip” rather than the balanced distortion most people picture. Mixing all three categories, above, below, overlay, produces the effect people actually recognize as Zalgo text.
Forgetting that some platforms strip combining marks on submit. A field can accept the character when you type it and then silently normalize or truncate it on save. Always test in the actual destination, a Discord message box, a bio field, a username form, rather than assuming a text editor preview will match.
Copy-pasting from unreliable sources. Some sites that claim to host “Unicode character lists” actually serve mismatched or corrupted code points because of encoding errors on their own page. Cross-check anything copied against an official Unicode chart if a character isn’t rendering the way you expect.
Losing count past ten or fifteen marks. Manual builds get genuinely hard to track visually once you’re past a handful of marks per letter, since your text editor renders the distortion as you type. This is one of the few places a generator has a real practical edge, not because the underlying technique is different, but because tracking forty stacked marks by eye is tedious.
Where Manual Zalgo Text Actually Holds Up
Custom distortion patterns. If you want an asymmetric effect, heavy distortion only on the first and last letter of a word, for instance, manual placement is the only way to control that precisely, since most generators apply intensity uniformly or randomly across a whole string.
Learning what a platform actually filters. Testing individual combining marks one at a time in a Discord username field or a game’s chat box tells you exactly which characters get through and which get stripped, information a generator’s finished output won’t reveal on its own.
One-off short use. For a single word, a username, a short caption, manually inserting six or eight marks takes under a minute once you’ve got your reference characters copied. For anything longer, it stops being worth the time; that’s genuinely a job for a generator.
Readability and Accessibility: What Changes When You Build It Yourself
Building manually doesn’t change the underlying accessibility tradeoffs, heavily stacked combining marks still create real friction for screen readers, which may read each mark aloud individually or skip the passage depending on the software. What manual construction does give you is finer control over exactly how much distortion you’re adding, which means you can deliberately stay under whatever threshold keeps text usable for your specific audience, rather than accepting whatever a preset slider gives you.
A practical middle ground worth adopting: build your manual version, then paste it into a plain test message to yourself before sending it anywhere that matters. If you can still read it in about two seconds without already knowing what it says, it’s usable. If you can’t, you’ve over-stacked it, pull marks off letter by letter until it clears that bar again.
Manual Zalgo vs. Other Distortion Styles
Not every “creepy text” request calls for Zalgo specifically. If what you actually want is medieval-looking blackletter for something like an event caption or a username, that’s a completely different Unicode approach, letter substitution rather than combining marks, and our gothic text generator guide covers how that style is built and why it reads as “serious” rather than “broken.” And if you’re trying to figure out what a piece of corrupted text someone sent means rather than how to build your own, our cursed text meaning breakdown covers how to read intensity and context as signals. For the broader question of which horror-adjacent style fits which situation, a text message versus a Halloween bio versus a creepypasta, the scary text generator pillar guide walks through that decision in full.
Frequently Asked Questions
Do I need special software to type Zalgo text manually?
No third-party app is required. Windows and macOS both ship with built-in Unicode hex input methods that let you type any combining mark’s code point directly, though enabling them requires a one-time settings change.
Why does my manually built Zalgo text look different on my friend’s phone?
Font rendering engines vary by operating system, and each one positions stacked combining marks slightly differently. This is a rendering difference, not an error in how you built the text, the same underlying characters, displayed by different software.
Can I build asymmetric or custom distortion patterns manually that a generator can’t produce?
Yes, that’s the main practical advantage of the manual method. You control exactly which marks go on which letter, so you can concentrate distortion on specific characters rather than accepting a generator’s uniform or randomized intensity.
Is manually typing combining marks slower than using a generator?
For anything beyond a single short word, yes, noticeably. Manual construction is worth it for precision or learning purposes; a generator is worth it for speed and volume.
Will platforms reject text built with manually inserted combining marks?
Some platforms filter or normalize combining characters regardless of whether they were typed manually or generated, since the underlying characters are identical either way. Always test the specific field you’re posting into rather than assuming.
Pingback: Ist Cursed Text sicher & seriös? Sicherheitscheck 2026
Pingback: ¿Cursed Text Creater es seguro y legítimo?
Pingback: Is Cursed Text Creater veilig en betrouwbaar?
Pingback: Czy Cursed Text Creater jest bezpieczny i wiarygodny?
Pingback: Cursed Text Creater Güvenli mi? Güvenlik Rehberi
Pingback: apakah-cursed-text-creater-aman-dan-terpercaya?
Pingback: Cursed Text Creater est-il sûr et légitime ?
Pingback: Cursed Text è sicuro e affidabile? Guida alla sicurezza
Pingback: Cursed Text Creater é seguro? Guia de segurança
Pingback: Beste Cursed Text Generatoren im Vergleich (2026)
Pingback: I migliori generatori di Cursed Text a confronto (2026)
Pingback: Cursed Text per Instagram – Font per bio e didascalie
Pingback: Cursed Text pour Twitter/X – Polices Glitch et Zalgo